


Microsoft is shifting more and more towards granular access control—and with that comes the need to create a custom role in Microsoft 365. While built-in roles still serve a purpose, they often lack the precision required in modern enterprise environments. That’s where custom roles step in, especially when combined with Microsoft Entra ID and the new RBAC model.
Custom roles allow organizations to align access permissions with their internal governance, compliance requirements, and operational boundaries. Unlike the traditional all-or-nothing model of assigning broad administrative roles, custom roles can be tightly scoped to meet specific business scenarios.
In this quick guide, you’ll learn how to create a custom role in Microsoft 365 in less than five minutes, giving you full control over permissions and minimizing overprivileged access.
➡️ Related reading: Secure Your Microsoft Graph API Access: Why and How I Implement RBAC for Applications in Exchange Online
Why You Should Create Custom Roles in Microsoft 365
As Microsoft phases out Application Access Policies in favor of role-based access control (RBAC), organizations need better ways to define exactly what users, apps, or service principals can do.
Built-in roles like Global Administrator or Exchange Administrator are often too broad. If all you want is read-only access to mailbox data, assigning one of those roles is overkill—and a security risk.
By choosing to create a custom role in Microsoft 365, you ensure:
- Least privilege access
- Better auditability
- Reduced attack surface
- Easier role reviews
Custom roles are also easier to audit and maintain over time. As your environment scales or changes, these roles can be adapted incrementally without compromising the entire access model.
Another benefit is the ability to assign roles to service principals. This enables scenarios like scoped access for background applications, automation scripts, or delegated access scenarios in multi-tenant environments
Prerequisites
Before you begin, make sure:
- Your tenant is licensed for Microsoft Entra ID P1 or P2
- You have one of the following roles: Privileged Role Administrator or Global Administrator
- You’ve defined the actions or operations the role should allow, based on your specific use case
For example, are you creating a role for mailbox monitoring? Or delegating limited access to a third-party app? Defining the scope in advance helps avoid misconfiguration.
Step-by-Step: Create Custom Role Microsoft 365
1. Open Microsoft Entra Admin Center
Navigate to https://entra.microsoft.com and select: Manage > Roles & administrators > Custom roles
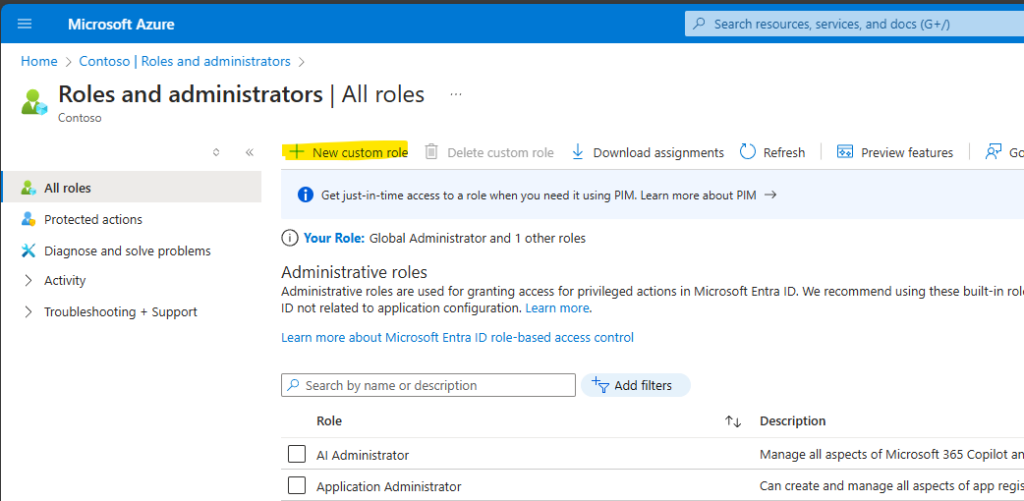
Click + New custom role.
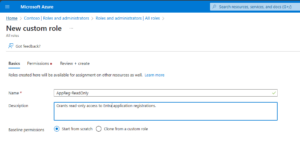
2. Define Role Basics
Give the role a meaningful name and optional description. Example:
- Name:
AppReg-ReadOnly - Description: „Grants read-only access to Entra ID application registrations.
Try to follow a consistent naming convention (e.g., Scope-Permission-Type) to simplify management.
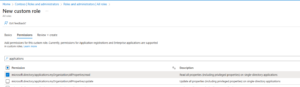
3. Add Permissions
Click „Next“ to select Permissions. You can choose from a vast list of permissions across Microsoft services. These are based on Microsoft Graph actions or directory roles.
For a read-only applications, you might use:
{
  "allowedResourceActions": [
    "microsoft.directory/applications.myOrganization/allProperties/read"
  ]
}
Use the Microsoft Graph permissions reference to explore available options. You can also combine multiple permissions to cover hybrid scenarios (e.g., read access to mailbox and calendar).
Be careful not to include unnecessary permissions. Every action should serve a specific operational goal.
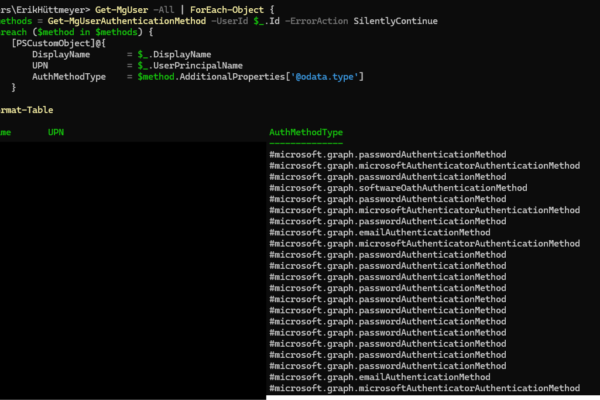
➡️ Need Graph scripting? See: Retrieve User Authentication Methods via Microsoft Graph PowerShell
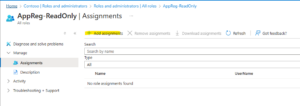
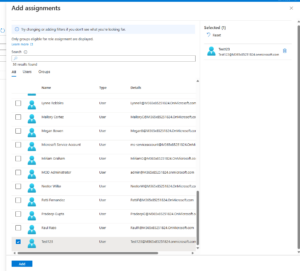
4. Assign the Role
After creating the role, go to: Identity > Roles & administrators > [Your Custom Role] > Assignments
Assign the role to a user, group, or service principal. Groups are particularly helpful for scaling and automating assignments. You can also use dynamic groups based on attributes such as department or job title.
Once assigned, users or applications will immediately receive the scoped permissions defined in your custom role.
Best Practices When Creating Custom Roles
- Be descriptive: Clear names and descriptions help during reviews.
- Use least privilege: Start with minimal permissions and add only what’s absolutely necessary.
- Test first: Assign the role in a dev environment before using it in production.
- Document assignments: Keep track of who gets what and why.
- Review roles periodically: RBAC is not a one-time setup. Reassess roles every few months.
- Use role templates: If you manage multiple tenants, standardized templates help reduce errors and maintain consistency.
Also consider pairing roles with Conditional Access Policies to ensure permissions are only effective under secure circumstances (e.g., compliant device, trusted location).
Conclusion
Learning how to create a custom role in Microsoft 365 is essential for organizations looking to adopt RBAC and enforce strict access controls. With Microsoft Entra ID and a few clicks, you can implement powerful, targeted roles that help secure your Microsoft 365 environment without over-privileging users or services.
Custom roles are one of the most effective ways to balance operational flexibility with security. They empower IT admins to delegate responsibility without compromising control. By building them thoughtfully and revisiting them regularly, you align your access model with your evolving security posture.
In under five minutes, you can move from broad roles to laser-focused access—a big win for both security and compliance.
Stay tuned for a follow-up where we cover automation of role assignments using PowerShell or Bicep!